
Using WebP (next-gen image) format on production sites
Introduction
In this article, we discuss the benefits of using WebP as an image format for delivering images on the web. We then delve into the details of how to achieve this on a site that is built on the WordPress CMS and hosted on WPEngine. Specifically, we will cover how to convert jpg/png images to webp, how to plan for browser support and fallback (polyfills) and how to deliver these WebP Images over a CDN.
Image Formats
The most common image formats on the web are: JPEG, GIF, and PNG. WebP is a new format developed by Google that is gaining popularity because of its compression ratio, image quality, file size and alpha channel support.
As the name derives its roots from WebM (Web Media Format) which commonly uses VP8/VP9 compression algorithm to achieve web optimized videos, the same algorithm is employed in WebP image formats. WebP can produce stunning results over conventional JPEG/PNG formats which is now widely used across the web development landscape. The anatomy of image compression is based on Lossy and Lossless (as the name suggests) algorithms where images can be contained within 8/16/24/32 bit color depth. In layman terms, more bits mean better color gamut and image quality with a trade-off on image size. For eg. a GIF image format which uses standard 256 color palette or custom palettes using 8-bit color depth has poor image quality.
This soon changed with JPEG/PNG image formats which offered more color depth and compression with better image quality, factored in with DPI (Dots per inch) to produce web and print media compatible images.
TIP: A web image should be encoded at 72dpi while print media files require 300dpi. An ideal example would be TIFF which is a Lossless image format popularly used in print media.
Using WebP images in WordPress
As of WordPress 5.5, it still doesn’t support WebP image format within the media library out of the box. The two most common problems are allowing WebP image uploads and generating previews in the media library. This is possible with some custom workarounds like setting hooks on mime_types and file_is_displayable_image API’s. Refer to the code snippet below:
//enable upload for webp image files.
function webp_upload_mimes($existing_mimes) {
$existing_mimes['webp'] = 'image/webp';
return $existing_mimes;
}
add_filter('mime_types', 'webp_upload_mimes');
//enable preview / thumbnail for webp image files.
function webp_is_displayable($result, $path) {
if ($result === false) {
$displayable_image_types = array( IMAGETYPE_WEBP );
$info = @getimagesize( $path );
if (empty($info)) {
$result = false;
} elseif (!in_array($info[2], $displayable_image_types)) {
$result = false;
} else {
$result = true;
}
}
return $result;
}
add_filter('file_is_displayable_image', 'webp_is_displayable', 10, 2);
@Source Attribution: https://stackoverflow.com/questions/54442929/wordpress-webp-image-previews
Using this snippet in your functions.php will allow you to upload WebP and preview them. Along the line there are several issues with how WordPress handles images in the media library, pointing out few common ones:
- Automatic generation of image sizes (thumbnails)
- Ondemand generation of image sizes (must have feature)
- Upscaling smaller images
Ondemand generation can be ruled out of this context, it’s more of a must have feature request yet to be addressed by the WP core team. Imagine a media library with 25k images; that just leaves you with supernatural nightmares of slower and unresponsive media library at times.
Advantages of using WebP images
Majority of browsers are still picking up with WebP support, but it shouldn’t discourage usage in production environments. Lining up some of the advantages of WebP that far outweigh the troubles of implementing it:
- Better image compression (Lossy)
- Better image quality (Lossy)
- Next-gen image format (future proof)
- Bandwidth savvy file size
- Improved page loading
If you have a site with lots of images it’s definitely worth going with WebP on your next project.Its a surefire way to speed up your website. The benchmark evaluation of Supernatural wallpaper below is even more convincing.

Image Size: 1920×1200
DPI: 96ppi
Depth: 16-bit
File Size: 1.1MB
Format: JPEG
Compression Quality: 75%
Algorithm: Lossy

Image Size: 1920×1200
DPI: 96ppi
Depth: 16-bit
File Size: 272.3KB
Format: WEBP
Compression Quality: 75%
Algorithm: Lossy
That’s 1.1MB image turned to 272.3KB with almost 75-80% file size improvement on an average with similar compression ratio and without compromising quality.
On a live use case of Burns & Wilcox corporate site where the home page payload size soared above 11MB was successfully reduced to 5.5MB with WebP images. That’s almost more than half the overall payload size for each page on an average.
Browser support and fallback (polyfills)
It could feel like “Doing a 360° somersault” when addressing WebP browser support. Following the footsteps of Internet Explorer, Safari is the biggest concern. According to CanIUse:
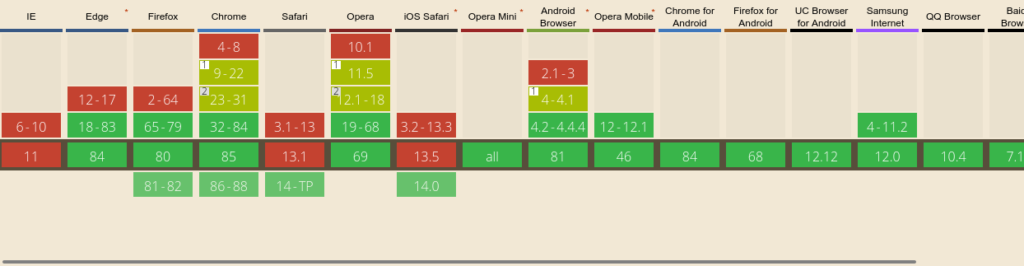
@Source Attribution: https://caniuse.com/#search=webp (Aug 28, 2020)
This often discourages most developers from using WebP as most clients/users still use Safari as their mainstream browser. At this stage though, you should stop mulling over workarounds to overcome these shortcomings for any browser that doesn’t fully support WebP. Use the HTML5 <picture></picture> tag wrapped around your images so you can still render generic image formats like JPEG/PNG as fallbacks. For eg:
<picture></picture>
<source srcset="assets/img/hero.webp" type="image/webp">
<source srcset="assets/img/hero.jpg" type="image/jpeg">
<img src="assets/img/hero.jpg" alt="Hero">
This was relatively easy but what about CSS? In CSS3 Background you don’t get fallback mechanisms, instead a more reasonable approach is to add contextual classes to the <body> tag and load relevant image based on a browsers WebP support, like:</body>
body.no-webp .hero {
background-image: url("assets/img/hero.jpg");
}
body.webp .hero{
background-image: url("assets/img/hero.webp");
}
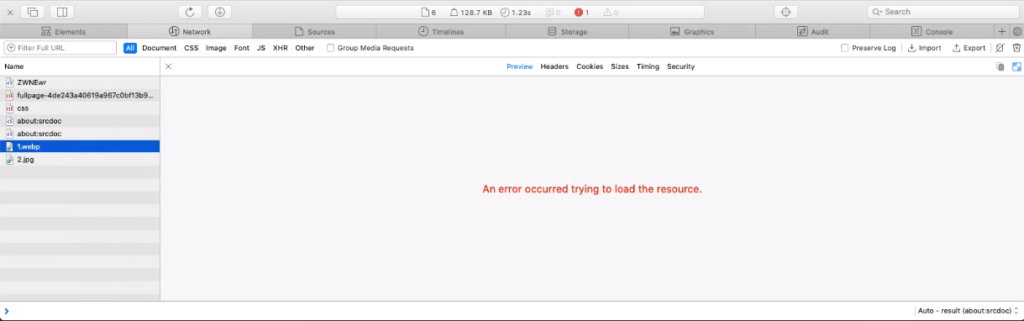
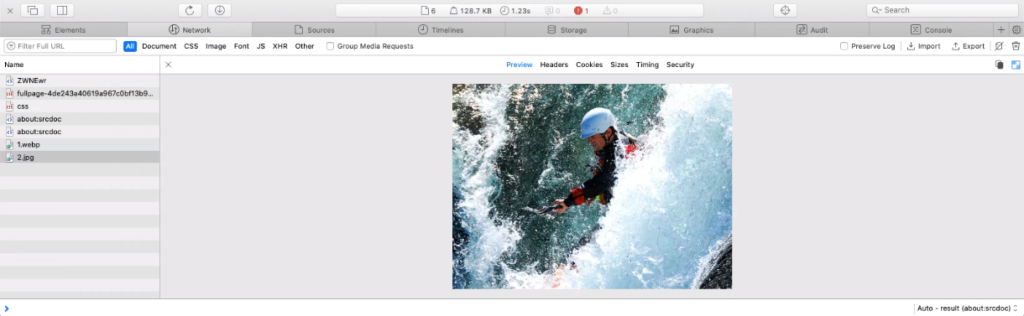
This solves one problem with Modernizr and some polyfills but presents a new challenge – both images are downloaded but only one is applicable. There’s one trivial workaround if you use image instead of url in your background image. This tweak seems to be working even with CSS3 Backgrounds but not widely used. See the code snippet and screenshot below:
.hero{
background-image: image(
"https://www.gstatic.com/webp/gallery/1.webp",
"https://www.gstatic.com/webp/gallery/2.jpg"
);
}
Batch Conversion of JPEG/PNG to WebP format
There could be several methods of doing batch conversions to WebP. You could do it with KIM for KDE Plasma Service (Linux), GwenView (Linux), ACDSee, IrfanView, Adobe Photoshop or CLI tools like cwebp, vips, ImageMagick or gd extensions.
To automate this process in WordPress one of the best plugin is WebP Express which can batch re-generate all images in WebP format and even serve them if configured correctly. It offers various configurations like Varied image responses, CDN friendly and Tweaked. CDN friendly is most commonly used for CDN enabled sites.
In general it’s ideal to keep WebP images in a separate folder apart from the media library. This not only ensures quick media library loading but keeps the clutter out of the WordPress media library. Once configured an existing media library can be setup to serve WebP images after batch conversion in WebP Express plugin, refer to screenshots below:

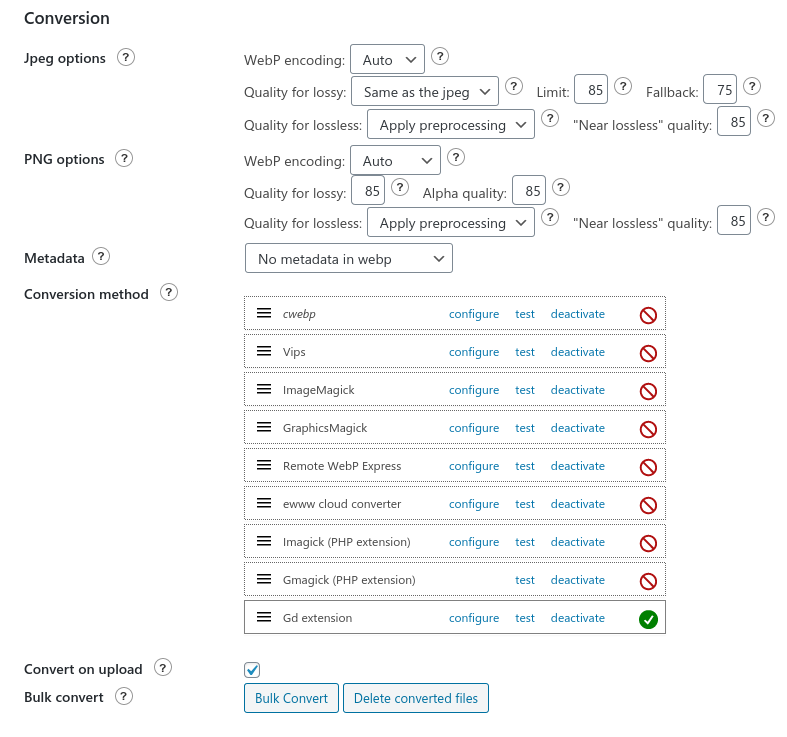
By clicking the Bulk Convert button it will start the batch conversion process of all the media library images. Keep the “Convert on upload” option checked to ensure images are converted automatically on upload.
Serving WebP Images from a CDN
For a production site, serving image assets over a CDN is common practice as it speeds up delivery to a user’s browser. In this section, we discuss the ways in which WebP images can be served up via a CDN on a WordPress site that is hosted on WPEngine. In particular, WebP Express plugin is a very handy tool to achieve this goal.
Apart from WebP Express, Jetpack (Photon) from Automattic can also serve WebP images using their exclusive CDN’s without the hassle of installing and configuring extra plugins. Jetpack is one click solution for lazy loading, serving WebP images, automated backups and much more.
For delivering WebP Images over a CDN in a WPEngine environment, WebP Express can be easily configured. If your configuration settings are “CDN friendly” in WebP Express then they are sufficient with one additional step. After the CDN is enabled in WPEngine just configure CDN hostname/alias(es) in your WebP Express configuration as below:
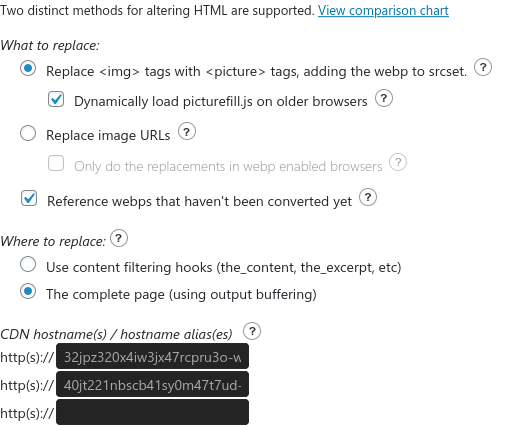
This will serve WebP images over the WPEngine CDN. There is a possibility of modifying this configuration according to your taste and hosting environment. Since WPEngine works with Apache and nGINX as proxy this configuration is ideal for serving WebP images over WPEngine CDN.
Summary
In this article, we discussed the benefits of using WebP as an image format for delivering images on the web. We then delved into the details of how to achieve this on a site that is built on the WordPress CMS and hosted on WPEngine. We then discussed how to convert jpg/png images to webp, how to plan for browser support and fallback (polyfills) and how to deliver these WebP Images over a CDN.