
Using Airtable with Webflow for dynamic data
Introduction
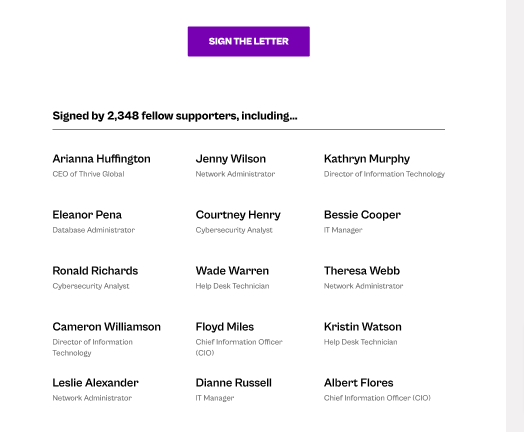
For one of our latest projects we were asked by our client to set up a page to collect and compile data related to their efforts in getting petition signatures for the cause to improve women's heart health. Heart disease affects 60 Million women across the United States as per the CDC. The project involved collecting the petition entries and also displaying the names and positions of the collected petition entries. The website was to be built on Webflow and the entries were to be collected on Airtable.
Airtable is a versatile database tool that many businesses and individuals use for project management, content calendars, CRM, and much more. Webflow, on the other hand, is a powerful web design tool that lets you create responsive websites without writing a single line of code. Integrating Webflow forms to submit data directly into Airtable can be extremely useful, but the process requires a bit of setup.
In this guide, we'll walk you through the process of setting up a Webflow form that submits data to an Airtable base using a simple JavaScript function and the Airtable API.
Prerequisites
- A Webflow account and a published site.
- An Airtable account with a base setup.
- The Airtable API documentation for your base (found by going to https://airtable.com/api and selecting your base).
Submitting entries to Airtable
Step 1: Set Up Your Webflow Form
Create a form in Webflow with fields that match the fields in your Airtable base. For our project we need the fields “First Name”, “Last Name”, “Company” and “Position”. Let’s go ahead and create a form with these fields.
Step 2: Get Your Airtable API Key and Base ID
- Your API key can be found in the settings of your Airtable account.
- Your Base ID can be found in the API documentation specific to your base on the Airtable API website.
Step 3: Connect the Webflow form to Airtable using Logic
Webflow has documentation on how to do this. Please refer to this article for more information.
In summary, we will use Webflow logic to connect each field to their respective table on Airtable and set up authentication and Webflow will take care of the rest.
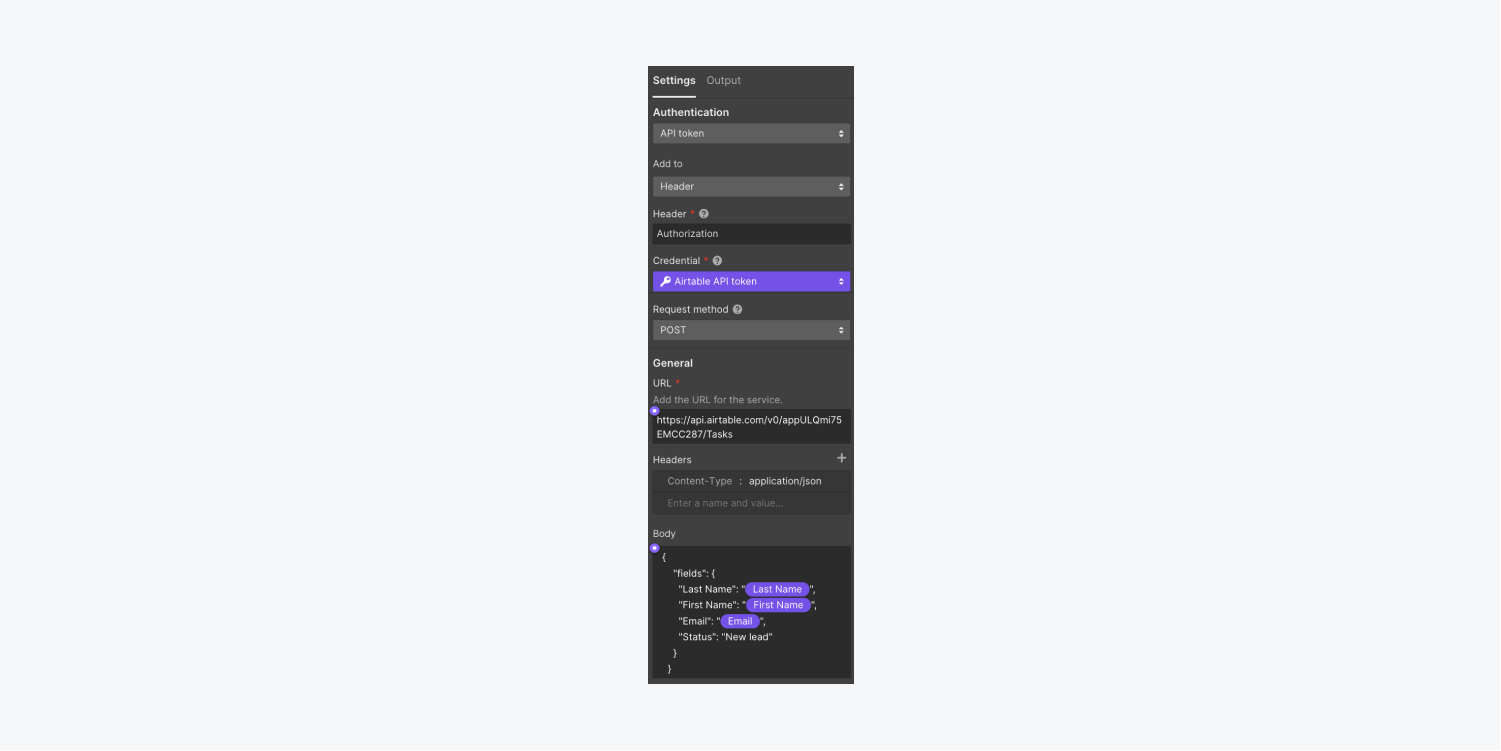
You will need the following to make this work:
- The ID of your Webflow form.
- Names of the fields of the form
- Your Airtable Base ID.
- ID of the table you want to insert records into.
- Your Airtable API Key
Once the form is connected, let’s test it out to see if the entries are being submitted on Airtable by submitting the form once. If everything is working fine, publish the site on Webflow.
Displaying entries from Airtable
The next step is to show the submitted petitions from Airtable on our page. We will use the Airtable javascript API for this. Also note our entries have pagination, so we will be using the offset which is received from the API as each call has a limit of 100 entries and the rest of the entries are paginated.
Let’s first look at our code.
Step 1: Fetching the total number of records in the table
The first step is to fetch the total number of entries as we will be using it for pagination. For this we create an Autonumber field which automatically counts the number of the entry being submitted. This is done by creating another linked record and then counting that. You can read this article to learn more about this field. By fetching the most recent entry from this column, we can get the total number of entries in our table. This value is stored in a variable called total.
Step 2: Fetching the first page
Next we make an API call to Airtable to fetch the first page. You’ll notice that our design has 27 records, so we’ll set the per page variable to 27. We also create an array where we save the response with the offset, so we can use it later. The values are put into HTML components and inserted into the page as required.
Step 3: Setting up pagination
Next we create the logic to get the next page and display that.
In our previous response, we received an offset which tells Airtable the page to fetch next. Let’s use this to fetch the next page of entries. On pressing the next button, another API call is made to Airtable with the offset and on success, we clear the section and repeat the same steps as above to print the entries on our page.
Configuring the previous button is easier. We’re already saving our pages in an array, we will use that array to repeat the printing process above and use the data we already have to show it when the user presses previous.
We will put conditional checks on the first and the last page using the total value we fetched earlier so that the buttons are disabled when the user reaches the first and the last page.
You will again need the following to make this work:
- Your Airtable Base ID.
- The table name/ID
- Names of the fields of the form
- Name of the Autonumber field
- Your Airtable API Key
Conclusion
By following the steps above, you have now integrated your Webflow form with Airtable. When users submit the form, their data will be directly added to your specified Airtable base. This integration provides a seamless way to capture data from your website and store it in a flexible and powerful database tool like Airtable. Being a Great Place to Work certified firm, we were more than happy to help provide our services to support women’s heart health.
If you like this insight and we want to know more about our work, feel free to reach out to us.