
Introduction to site personalization
Introduction
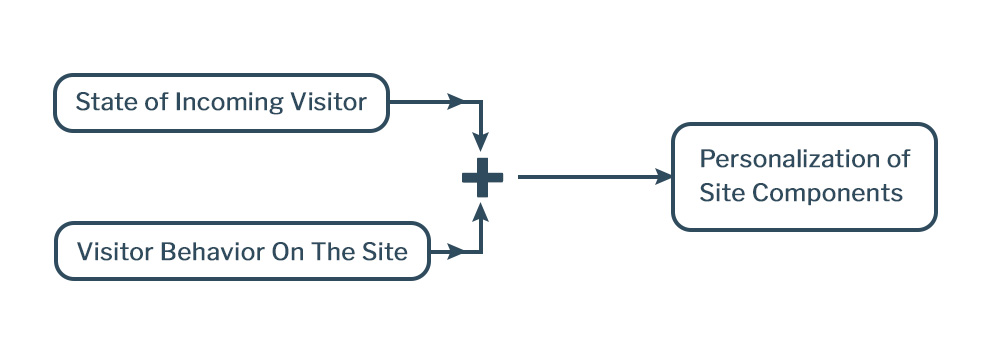
Site personalization is often considered the holy grail of 1-1 marketing. We introduce the three pillars of site personalization : Site components, Incoming state of a visitor and Behavior in the active session. Site personalization can provide a better and more personalized user experience to visitors based on their context. Components in the site can be tailored to the visitor according to the state of the incoming visitor or visitor behavior on the site.
In this post, we will explore what personalization really means and in a series of subsequent posts, we will show how to achieve it within several important CMS platforms such as WordPress, Drupal, Adobe Experience Manager, DotNetNuke and others.
There are three key concepts when thinking of site personalization:
- Site Components
- State of an Incoming Visitor
- Visitor Behavior on the Site
Site Components
In an earlier post, we talked about how websites are comprised of components (Link) that are organized hierarchically. For eg., the most basic elements would be things like colors, typography, links, buttons, lists and such. These elements are then grouped in larger components such as forms, modals, carousels and grids. Personalization essentially means that — based on the context — these components can be turned on/off or certain variants will be shown instead of the regular component. (Eg. Blue button instead of the default red button).
State of Incoming Visitor
This means the “prior state” of the incoming visitor. Is he a new or returning visitor, which country is he coming from, is he on a mobile device or a desktop, did he get click on our Facebook campaign to get our website etc? It is important to remember that “state” is a cumulative thing. Based on this user’s behavior on the site, the state will be updated. For eg., the user might fill out a form, download a document and then leave. Such a behavior would update the “lead score” of the user and his state would be updated. Next time the user comes to the site, the personalization would reflect the fact that his lead score is now much higher than earlier. For eg. we might give him a time-limited purchase offer.
Here is a list of things that can define the state of an incoming visitor:
- New vs. returning
- Known vs. Unknown
- Location: Can be at a country, state, city or even IP level
- Device Type: Desktop, Mobile, iPhone, Samsung etc
- Browser: Chrome, Edge, Firefox..
- Campaign: If the user clicks on an ad that is part of a campaign
- Segment: User is part of a marketing segment (Eg. women under 30)
- Goal Status: You can define goals in your analytics platform. Has the user hit one or more of these goals?
- Lead Score: Each event or goal can be assigned a lead score. Based on the user hitting some of these, they get assigned a lead score.
- Referring Domains: The domain that the user is coming in from
Visitor Behavior on the site
Finally, we can personalize based on the user’s behavior on the site for his active session. This can include things like:
- Time spent on site
- # of Pages clicked
- Any events triggered (Form submits, chat with a rep etc)
- Any particular category of content viewed (Eg. Product Pages, Blog Posts etc)
- Time: Month, Day, Hour
In summary, the combination of these two — prior state of visitor, activity on the site — can determine which components are personalized and how.
Working Example
To make these ideas concrete, we will take a use case and in a series of subsequent posts, show you how to do this in various CMS platforms.
First, we will show the bar at the top only to returning visitors but not to new visitors.
Second, the image will change based on the following conditions:
Default
User comes in from outside the USA
User clicks on a campaign that has utm_campaign=demo-personalization in the URL
Finally, if the user has already submitted the form then he will not see it again. Rather he will see a text block that looks like this.
To see this implementation in WordPress, go here. If you’d like to see it implemented in Adobe Experience Manager, go here.