
Front end development with Strapi and NextJS

Introduction
This article provides a comprehensive guide on setting up a front-end with NextJS and a backend using Strapi CMS, integrated with a PostgreSQL database and covering the installation and configuration of PostgreSQL, setting up Strapi, and building a NextJS application with TypeScript and Apollo Client for GraphQL queries. Read more to dive deep into the whole process.
Setting up a NextJS frontend with a Strapi backend and a postgreSQL database.
Executive Summary
In this post, we do the following:
- Set up postgreSQL and configure a database to use with our application
- Set up Strapi on our local system and configure it with the database we created in the first step.
- Create a nextJS app with Typescript and SSR.
- Set up an Apollo client with GQL and connect to our Strapi database to retrieve content.
- Create a page which pulls in data from Strapi and displays it on our nextJS app.
An introduction to the tech stack
Strapi is an open-source headless javascript CMS which integrates with any front-end framework allowing us to create and manage dynamic content for our website. It currently supports four databases - Mysql, MariaDB, PostgreSQL and SQLite. Strapi works on top of NodeJS and provides us with a few APIs to pull in as well as modify data on our database. In this way Strapi provides us with a headless CMS to easily manage our data.
NextJS is another open source framework built on the React javascript framework which provides us with tools to get a front-end application which interacts with an API up and running in minutes. It provides us with a base to build our user-interface on, routing based on folder structure for our app, ways to interact with our API and bunch of performance tweaks to streamline our development process.
We’ll be using a PostgreSQL database for Strapi and an open-source NextJS graphQL library Apollo. We’ll also use Typescript to structure our project and make it easier to debug.
PostgreSQL installation
First we will have to install a PostgreSQL client for development.
You can find a download link for your platform on this page. You can also use Brew to install it and use it through the command line.
brew install postgresql
Run it in the background with this command.
brew services start postgresql
You now have PostgreSQL running. Now let’s create an empty database for our application. First login as user “postgres” to setup our user and database.
Use the following commands to create a new database and a user and grant the user access to the database for our application.
Strapi config and database setup
Now that we have a database, let's begin to create our Strapi instance.
We will use npm as our package manager and you will need NodeJS to run our Next app as well as Strapi.
We’ll first set up Strapi. Let’s create a folder called “strapi” in our git repository and install Strapi there.
You will have the option of Quickstart or Custom. You will have to go with the custom option as we will be setting up our database manually. Now that you have Strapi setup, let’s configure it to use the database we created in the step above.
First you’ll have to configure database.js in the config folder and initialize them with environment variables which we can insert easily later.
You’ll also need to configure server.js to accept environment variables like the port number and authentication keys.
Now in the Strapi root folder create a .env file to save our database credentials and port details.
Enter the database name, username and password in the required sections. You will need to know the port on which PostgreSQL is running, you would have selected that during the installation. Let’s also set the Strapi port to 1337, which the graphql api will be accessible through. Make sure the credentials are correct and PostgreSQL is running in the background.
There are multiple configuration options available on Strapi. If you’re setting up a CDN for your uploaded images you might want to set that up. There are error gathering options available here as well as other options. You can check the Strapi documentation to see what they are.
Next let’s run the project to start up and see if Strapi is working.
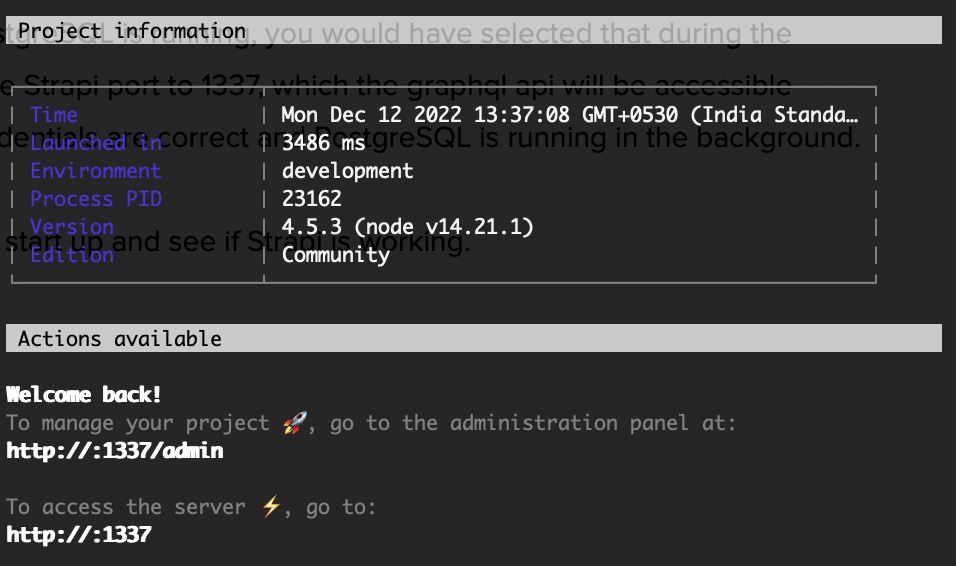
If everything goes as planned, you should see the screen above and our Strapi server is running on port 1337.
The Strapi admin panel can now be accessed via “http://localhost:1337/admin”. On your first visit you will be asked to create an administrator account, once you do that, you can login.
NextJS config and setup with Typescript
Next we are going to set up the NextJS frontend for our application. We are also going to use Typescript to make it easier to debug our code. In your project directory create a folder called next where we will install and run NextJS.
This will create a NextJS project with Typescript ready for use. Next let’s create a tsconfig.json file in our root and put the following configurations in it.
This will tell our Typescript which files to include for checking and other configuration options.
Apollo client setup for GQL queries
Next we will be setting up the GQL part of our project. For querying the Strapi database we will use Apollo Client. Let’s setup codegen to generate our types.ts file with all the types and GQL queries required for our project.
This will install the graphql-codegen cli and typescript plugins required for generating our types.ts file. Next we will create a codegen.yml file with the configuration telling the codegen which folders to search for gql files and set it up.
You can also add graphql-codegen to your package.json to make it easier to run. Now on running graphql-codegen the types.ts file will be generated with types based on our queries and database. It will automatically get the schema from the local Strapi environment and set up our types for us.
Example page where data is fetched using the entire process
Now that both the frontend and backend are setup, let’s try querying the database for something. First go to Strapi and login through the admin panel. Go to the content type builder and create a type Blog.
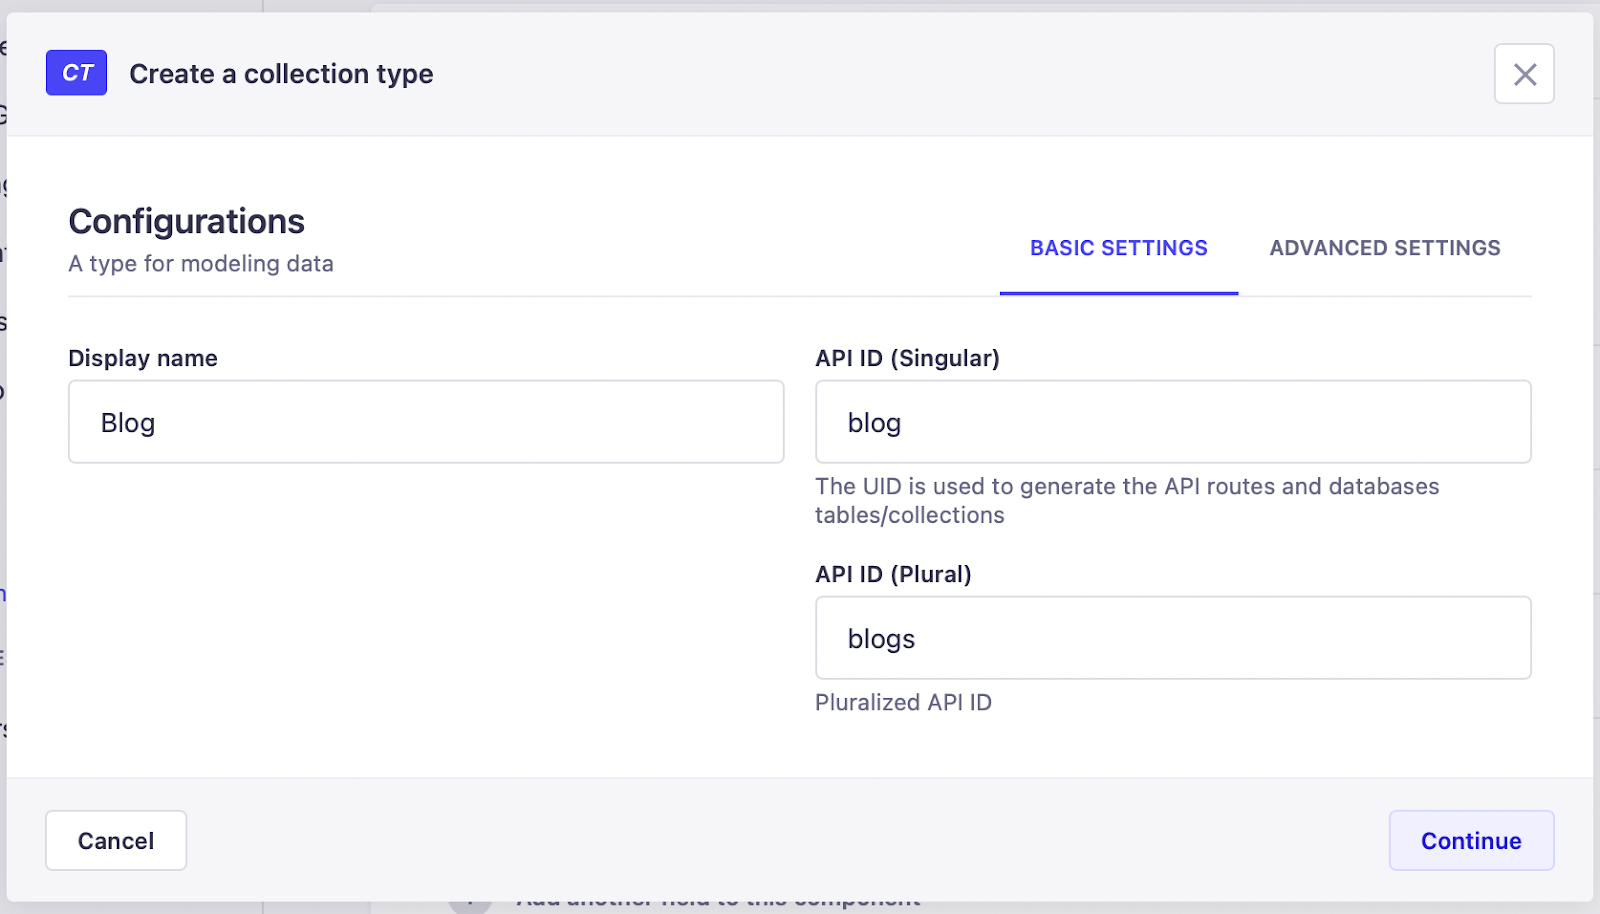
Now let’s add two fields, a title and a description.

Now go ahead and add sample value to the blog item. Now that you’ve done that we can go ahead and create a query to pull in the data on out NextJS app. Create a .gql file with the following query in the gql folder we created for our codegen.
Now on running codegen a type blog will be created for us with the fields title and description. Now we can go ahead and query that on our page with get static props.
This will generate our page with the props before loading, so that our data is available before the page loads. You can log articles variable to see the data and use it as you see fit.
Conclusion
Next.js is considered as one of the most flexible and fast React frameworks for front-end development. Strapi ( built on React as well ) provides a backend solution that's developer friendly, scalable and highly secure. In this post, we brought them both together to help you understand the process involved in managing Next.js application content with the support of a powerful backend powered by Strapi. We hope you enjoyed this step by step guide to front end development with Strapi and Nextjs.